Yeah, sorry about that. Probably it's only a heartbeat on the blog. Not likely that I write any new article in the near future. Although I'd like to inform you, what I'm up to so far.
So, I kinda started to learn Objective C. My first goal is to write a decent iPhone application. Just for fun, for learning the language and getting some experience. I have certain plans, but I don't want to speak about it yet. I've found the official Apple documentation good. But - how to say. It's just too much to dive in for beginners like me. I've bought a quite good book: http://www.amazon.com/Learn-Objective-ndash-Mac/dp/1430218150/ref=sr_1_1?ie=UTF8&s=books&qid=1283887700&sr=8-1 It describes the fundamentals of the language. For me some part seems really weird, like filters and modifiers. But hey, compiler matters, not the syntax. Unfortunately in the last couple of months I also hung that on, but intent to start working with it again.
I did some major refactoring on my Grpahmind app. It was a good experience for me but still can't feel the good level with design patterns. I have to learn a lot. The trick is that you have to know the future capabilities and the current features. I felt sometimes I did overkill with separation. And misused a lot of patterns. One thing for sure, you have to do it again and again.
I was involved quite a lot of Drupal projects as well. I really like it. I'm getting more experience about the actual site-architect part and also about the Drupal-ways. Thanks to my current company and our lead I can work in Brussel now for a month and a half in a huge company. It's a really good experience just seeing how things are going in a different, enterprise environment. You can feel it, you can see it. It's amazing. It's a completely different workflow.
That's it. I'd like to come back with some beneficial articles later, so see you.
Tuesday, 7 September 2010


Friday, 26 February 2010
Drupal installer script - version 2
Hi Readers,
Last night I felt the need of a new Drupal installer script. My old one (http://itarato.blogspot.com/2009/06/drupal-sandbox-creator-shell-script.html) had some flaws: it used a static preinstalled tarball with a static database dump. My new one use a fresh Drupal 6.15 package and just help to get to the install screen:
Basically you need a Drupal package under: PATHTOTARBALL/drupal-6.15.tar.gz and that's it. Dont't forget to change all the capital letter words to your environment.
Regards,
Peter
Last night I felt the need of a new Drupal installer script. My old one (http://itarato.blogspot.com/2009/06/drupal-sandbox-creator-shell-script.html) had some flaws: it used a static preinstalled tarball with a static database dump. My new one use a fresh Drupal 6.15 package and just help to get to the install screen:
echo "> Install Drupal Site - v 0.1"
# Enter the webroot
cd YOURWEBROOT
# Uncompress the latest Drupal tarball
tar -xzf PATHTOTARBALL/drupal-6.15.tar.gz
# Asks for a site name (folder - database in one step)
read -p "> Site name: " site_name
# Rename the web folder
mv drupal-6.15 $site_name
echo "> Site folder is ready"
# Create config files
cd $site_name/sites/default
mkdir files
cp default.settings.php settings.php
# Setting file ownerships
sudo chown WEBSERVERUSER files
sudo chown WEBSERVERUSER settings.php
echo "> Config is ready"
# Creating database
mysql -u root --password=YOURPASSWORD -e "create database $site_name"
# Under OS-X opens a browser with the site's install screen
open http://localhost/$site_name
echo "> Arigato gozai mashi ta!"
Basically you need a Drupal package under: PATHTOTARBALL/drupal-6.15.tar.gz and that's it. Dont't forget to change all the capital letter words to your environment.
Regards,
Peter
Hungarian Drupal Podcast - Episode 8
Hi Readers,
Are you interested in Drupal project management? How to do specification, development and maintenance? Check this out:
In the next episode we have our first (human) guest: Kristof Van Tomme (http://twitter.com/kvantomme) and we will speak about our new Knowledge Management System: http://pronovix.com/solution/alpha-1-knowledge-management-open-atrium-test-it-now
Cheers,
Peter
Are you interested in Drupal project management? How to do specification, development and maintenance? Check this out:
In the next episode we have our first (human) guest: Kristof Van Tomme (http://twitter.com/kvantomme) and we will speak about our new Knowledge Management System: http://pronovix.com/solution/alpha-1-knowledge-management-open-atrium-test-it-now
Cheers,
Peter
Sunday, 21 February 2010
Hungarian Drupal Podcast - Episode 7
Hi Readers,
Here you are the seventh podcast:
We are basically in a conceptual crisis. We have to decide what we want to talk about. Drupal, web, code or life. This episode is a mutant episode, but we liked it very much.
Regards,
Peter
Here you are the seventh podcast:
We are basically in a conceptual crisis. We have to decide what we want to talk about. Drupal, web, code or life. This episode is a mutant episode, but we liked it very much.
Regards,
Peter
Wednesday, 6 January 2010
Peer to peer video and audio streaming with Flex
Hi Readers,
This going to be a quick blogpost about how to build a simple video and audio streaming app in Flex. All the fame is for the Adobe Stratus service, and for Tom Krcha, a very great Adobe tech evangelist: http://www.flashrealtime.com/basics-of-p2p-in-flash/ (this is the original article.) Most of my code is from there! Great thanks for your excellent tutorial.
So, first take a look at the Stratus service: http://labs.adobe.com/technologies/stratus/ It allows to your Flash app to create P2P connection between clients. Cool, isn't it?
Our app will open the default camera and microphone streams and transfer to any other client we share our peerID with. I succeeded to open 3 additional connection. That's already two more than Skype allows. Of course, it's not that good.
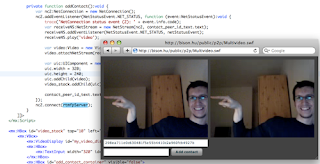
Ok ok, maybe it's better to try it out: Multivideo.swf
- Allow your camera and microphone to connect
- Share your peerID with your partners using the app (your peerID is in the first text box)
- Add new streams by adding other contacts' peerIDs: copy their peerID into the 2nd textbox and click on [Add contact]
(On some systems sometimes firewall blocks the stream.)
Let's do it than. We need some UIComponent. A base video display and some textbox and a button:
HBox allows us just pushing the new stream UI elements into the horizontal queue.
Using Stratus we have to register for a Stratus API key. We will get an ID and the url:
Than make some vars:
When the application successfully loaded, we can init our camera, microphone and the net connection for outgoing streams:
Taking the cam/mic is quite straightforward:
I said so. Than the net connection to the stratus server through RTMFP protocol:
When the net connection is ready, we can establish the sending stream:
This is the point we've got out peerID we can share. wOOt! On setting the provider stream we can attach out camera to the stream. And we can define a client object accepts the connection (return true;):
So far we have a working camera, microphone, and the stream is already on. Now prepare for accepting others stream:
When we get a new stream, we create a new video object and add onto the stage.
I know, it's far far basic, but it's good for starting a tool like this.
Download the source code.
Bests,
Peter
This going to be a quick blogpost about how to build a simple video and audio streaming app in Flex. All the fame is for the Adobe Stratus service, and for Tom Krcha, a very great Adobe tech evangelist: http://www.flashrealtime.com/basics-of-p2p-in-flash/ (this is the original article.) Most of my code is from there! Great thanks for your excellent tutorial.
So, first take a look at the Stratus service: http://labs.adobe.com/technologies/stratus/ It allows to your Flash app to create P2P connection between clients. Cool, isn't it?
Our app will open the default camera and microphone streams and transfer to any other client we share our peerID with. I succeeded to open 3 additional connection. That's already two more than Skype allows. Of course, it's not that good.

Ok ok, maybe it's better to try it out: Multivideo.swf
- Allow your camera and microphone to connect
- Share your peerID with your partners using the app (your peerID is in the first text box)
- Add new streams by adding other contacts' peerIDs: copy their peerID into the 2nd textbox and click on [Add contact]
(On some systems sometimes firewall blocks the stream.)
Let's do it than. We need some UIComponent. A base video display and some textbox and a button:
<mx:HBox id="video_stack" top="10" left="10">
<mx:VBox>
<mx:VideoDisplay id="my_video_display" width="320" height="240"/>
<mx:HBox>
<mx:TextInput width="320" id="farPeerId_text" text="Your Peer ID is loading..."/>
</mx:HBox>
<mx:HBox id="add_contact_container" visible="false">
<mx:TextInput id="contact_peer_id_text" width="200"/>
<mx:Button label="Add contact" click="{addContact();}"/>
</mx:HBox>
</mx:VBox>
</mx:HBox>
HBox allows us just pushing the new stream UI elements into the horizontal queue.
Using Stratus we have to register for a Stratus API key. We will get an ID and the url:
private var rtmfpServer:String = 'rtmfp://stratus.adobe.com/cbd2224f9a56771b3d4d05c3-bd9b549abca2';
Than make some vars:
private var nc:NetConnection;
private var sendNS:NetStream;
private var neerPeerID:String;

private var cam:Camera;
private var mic:Microphone;
When the application successfully loaded, we can init our camera, microphone and the net connection for outgoing streams:
private function init():void {
initCamera();
initNetConnection();
}
Taking the cam/mic is quite straightforward:
private function initCamera():void {
if (Camera.names.length > 0) {
cam = Camera.getCamera();
my_video_display.attachCamera(cam);
}

if (Microphone.names.length > 0) {
mic = Microphone.getMicrophone();
}
}
I said so. Than the net connection to the stratus server through RTMFP protocol:
private function initNetConnection():void {
nc = new NetConnection();
nc.addEventListener(NetStatusEvent.NET_STATUS, netStatusEvent);
nc.connect(rtmfpServer);
}
When the net connection is ready, we can establish the sending stream:
private function netStatusEvent(event:NetStatusEvent):void {
trace('NetConnection status event (1): ' + event.info.code);
if (event.info.code == 'NetConnection.Connect.Success') {
neerPeerID = nc.nearID;
farPeerId_text.text = neerPeerID;
initSendNetStream();
add_contact_container.visible = true;
}
}
This is the point we've got out peerID we can share. wOOt! On setting the provider stream we can attach out camera to the stream. And we can define a client object accepts the connection (return true;):
private function initSendNetStream():void {
sendNS = new NetStream(nc, NetStream.DIRECT_CONNECTIONS);
sendNS.addEventListener(NetStatusEvent.NET_STATUS, netStatusEvent);

var clientObject:Object = new Object();
clientObject.onPeerConnect = function(ns:NetStream):Boolean {return true;}

sendNS.client = clientObject;
sendNS.attachCamera(cam);
sendNS.attachAudio(mic);
sendNS.publish('video');
}
So far we have a working camera, microphone, and the stream is already on. Now prepare for accepting others stream:
private function addContact():void {
var nc2:NetConnection = new NetConnection();
nc2.addEventListener(NetStatusEvent.NET_STATUS, function (event:NetStatusEvent):void {
trace('NetConnection status event (2): ' + event.info.code);
var receiveNS:NetStream = new NetStream(nc2, contact_peer_id_text.text);
receiveNS.addEventListener(NetStatusEvent.NET_STATUS, netStatusEvent);
receiveNS.play('video');

var video:Video = new Video();
video.attachNetStream(receiveNS);

var uic:UIComponent = new UIComponent();
uic.width = 320;
uic.height = 240;
uic.addChild(video);
video_stack.addChild(uic);

contact_peer_id_text.text = '';
});
nc2.connect(rtmfpServer);
}
When we get a new stream, we create a new video object and add onto the stage.
I know, it's far far basic, but it's good for starting a tool like this.
Download the source code.
Bests,
Peter
Friday, 25 December 2009
Lolcat viewer
Hi Readers,
What a peaceful Christmas day, isn't it? In the morning I wrote a small AIR application brings lolcats into your desktop. Basically it's a dummy RSS reader for ICanHasCheezburger shows the latest kittens. Here you are:
Let's take a look at the code:
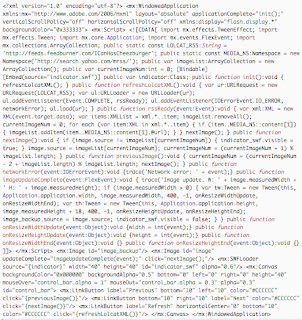
I used Flex with Flex SDK 3.0.
First we need a couple of display objects:
For the SWF animation it's highly suggested to embed the SWF movie itself:
Loading RSS feed is stupid simple. The feed's address:
And the upadating function for getting the feed itself:
Let's see what we have got when the request comes back (this is the event I registered for Event.COMPLETE):
I really like the ActionScript 3 XML layer. XML is already a native ActionScript 3 item, and the XML and XMLList classes make processing XMLs so easy. Quickly the response string is converted to XML and traversed for the important lolcat URLs. On every RSS reload I save results in the imageList ArrayCollection variable. I used one defined namespace, because the URLs can be found under that namespace:
Right after getting the response the first image is displayed. These are the stepping functions:
One last small trick. When the image container triggers an updateComplete event, the whole resized for the appropriate image's size:
With the Tween class it's also easy. This is the full Flex source, if you are interested in:
Download Lolcat's source.
And one other cool thing. I've seen a lot that awesome AIR installer object on many sites. So, made a bit research and found this tool you can make your own AIR installer:
Adobe AIR intaller badge This is what you see above.
Happy holidays,
Peter
What a peaceful Christmas day, isn't it? In the morning I wrote a small AIR application brings lolcats into your desktop. Basically it's a dummy RSS reader for ICanHasCheezburger shows the latest kittens. Here you are:
Let's take a look at the code:

I used Flex with Flex SDK 3.0.
First we need a couple of display objects:
- Image container: the main lolcat image
- Secondary image container: the same lolcat image with delay. It makes transitions seamless.
- Indicator: an external SWF animation indicates network loading
- Control bar: previous / next / refresh buttons
 <mx:Image id="image_backup"/>
<mx:Image id="image" updateComplete="imageUpdateComplete(event);" click="nextImage();"/>

<mx:SWFLoader source="{indicator}" width="40" height="40" id="indicator_swf" alpha="0.6"/>

<mx:Canvas backgroundColor="0x000000" backgroundAlpha="0.5" bottom="0" left="0" right="0" height="40"
 mouseOver="control_bar.alpha = 1"
 mouseOut="control_bar.alpha = 0.3"
 alpha="0.3"
 id="control_bar">
 <mx:LinkButton label="Previous" bottom="10" left="10" color="#CCCCCC" click="{previousImage()}"/>
 <mx:LinkButton bottom="10" right="10" label="Next" color="#CCCCCC" click="{nextImage()}"/>
 <mx:LinkButton label="Refresh" horizontalCenter="0" bottom="10" color="#CCCCCC" click="{refreshLolcatXML()}"/>
</mx:Canvas>
For the SWF animation it's highly suggested to embed the SWF movie itself:
   [Bindable]
  [Embed(source="indicator.swf")]
  public var indicator:Class;
Loading RSS feed is stupid simple. The feed's address:
public static const LOLCAT_RSS:String = 'http://feeds.feedburner.com/ICanHasCheezburger';
And the upadating function for getting the feed itself:
   public function refreshLolcatXML():void {
   var ur:URLRequest = new URLRequest(LOLCAT_RSS);
   var ul:URLLoader = new URLLoader(ur);
   ul.addEventListener(Event.COMPLETE, rssReady);
   ul.addEventListener(IOErrorEvent.IO_ERROR, networkError);
   ul.load(ur);
  }
Let's see what we have got when the request comes back (this is the event I registered for Event.COMPLETE):
   public function rssReady(event:Event):void {
   var xml:XML = new XML(event.target.data);
   var items:XMLList = xml.*..item;
   imageList.removeAll();
   currentImageNum = 0;
   for each (var item:XML in xml.*..item) {
    if (item..MEDIA_NS::content[1]) {
     imageList.addItem(item..MEDIA_NS::content[1].@url);
    }
   }
   nextImage();
  }
I really like the ActionScript 3 XML layer. XML is already a native ActionScript 3 item, and the XML and XMLList classes make processing XMLs so easy. Quickly the response string is converted to XML and traversed for the important lolcat URLs. On every RSS reload I save results in the imageList ArrayCollection variable. I used one defined namespace, because the URLs can be found under that namespace:
public static const MEDIA_NS:Namespace = new Namespace('http://search.yahoo.com/mrss/');Right after getting the response the first image is displayed. These are the stepping functions:
   public function nextImage():void {
   if (image.source != imageList[currentImageNum]) {
    indicator_swf.visible = true;
   }
   image.source = imageList[currentImageNum];
   currentImageNum = (currentImageNum + 1) % imageList.length;
  }

  public function previousImage():void {
   currentImageNum = (currentImageNum - 2 + imageList.length) % imageList.length;
   nextImage();
  }
One last small trick. When the image container triggers an updateComplete event, the whole resized for the appropriate image's size:
   public function networkError(event:IOErrorEvent):void {trace('Network error: ' + event);}

  public function imageUpdateComplete(event:FlexEvent):void {
   trace('Image update. W: ' + image.measuredWidth + ' H: ' + image.measuredHeight);
   if (image.measuredWidth > 0) {
    var tw:Tween = new Tween(this, Application.application.width,  image.measuredWidth,       400, -1, onResizeWidthUpdate,  onResizeWidthEnd);
    var th:Tween = new Tween(this, Application.application.height, image.measuredHeight + 18, 400, -1, onResizeHeightUpdate, onResizeHeightEnd);
    image_backup.source = image.source;
    indicator_swf.visible = false;
   }
  }
With the Tween class it's also easy. This is the full Flex source, if you are interested in:
Download Lolcat's source.
And one other cool thing. I've seen a lot that awesome AIR installer object on many sites. So, made a bit research and found this tool you can make your own AIR installer:
Adobe AIR intaller badge This is what you see above.
Happy holidays,
Peter
Subscribe to:
Posts (Atom)